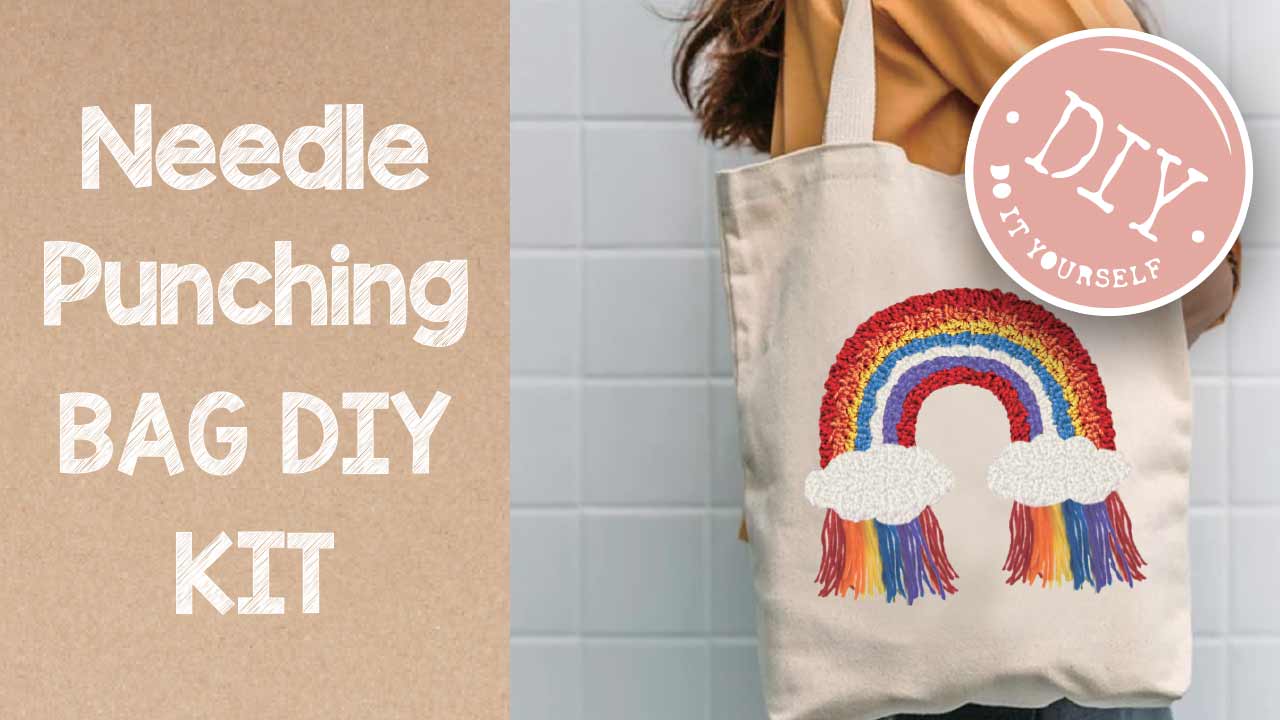
Needle Punching Bag – DIY Kit
YouTube Link is here.
PDF needle punch bag diy kit instructions
Get ready to punch up your weekend! In this step-by-step tutorial, we show you exactly how to create a cheerful rainbow canvas bag using the Needle Punch Bag DIY Kit. You’ll learn how to secure fabric in the frame, thread and work the punch needle, fill in colorful sections of the rainbow, and add playful tassels and fluffy clouds. Perfect for beginners and seasoned makers alike — this project is as fun as it is satisfying.
Quick tips: It may seem strange, but you are punching from the inside of the bag to get the texture on the outside. Be patient. The needle is sturdy, but if you’re a little too enthusiastic it can break — no worries though, replacements are easy to find and inexpensive at most craft stores or on Amazon. Space your stitches evenly or you may run out of wool.
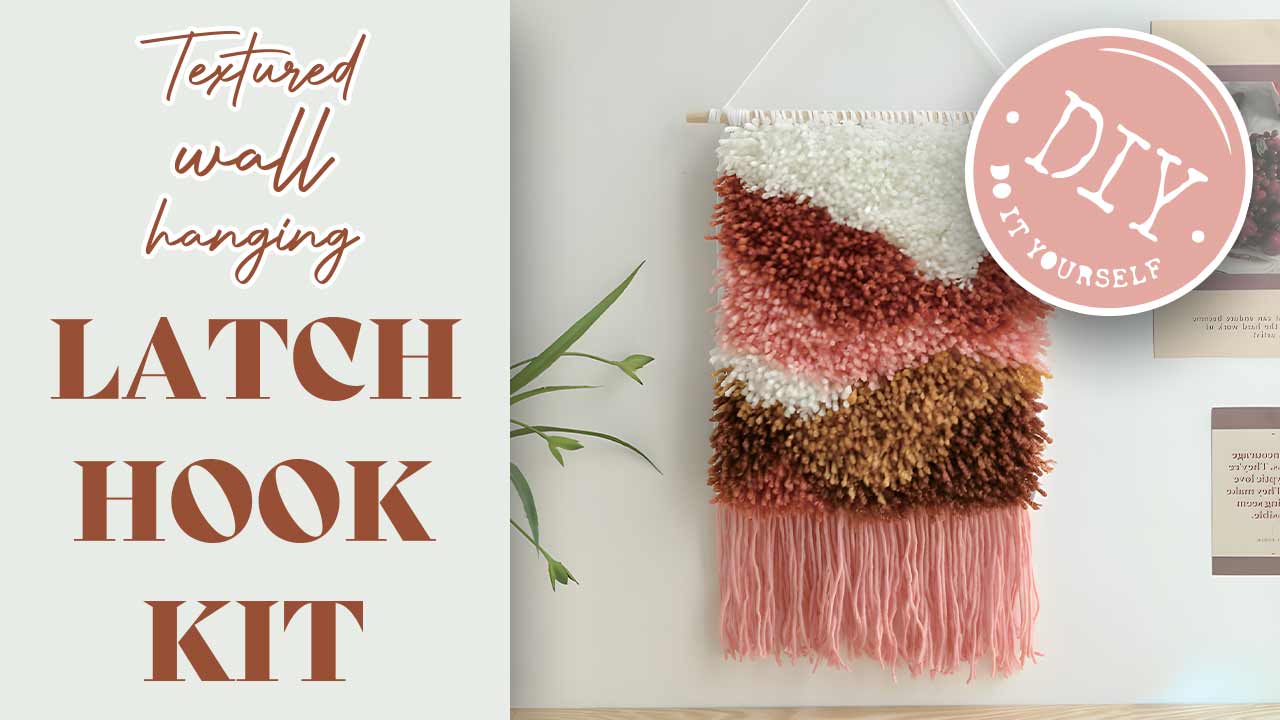
Textured Wall Hanging – Latch Hook DIY Kit
YouTube Link is here.
PDF textured wall latch hook kit instructions
Create a cozy textured wall hanging with this easy latch hook kit! In this tutorial, we walk you through every step — from hooking your first piece of wool to adding perfectly trimmed tassels for a soft, modern finish. No experience needed. Just follow along as we match colors, crochet into the grid, and build a piece you’ll love to display. Get ready to snip, hook, and fluff your way to something gorgeous for your walls!
Please note that our designer uses the word “Crochet and crochet hook” in the video, which is not the right term for latch hook. You are using a latch hook tool to pull yarn through the canvas and secure it with a knot.
Textured Cosmetic Bag – Latch Hook DIY Kit

YouTube Link is here.
PDF Is here. textured cosmetic bag instructions
Learn how to make a gorgeous textured cosmetic bag using yarn and a latch hook technique. In this step-by-step tutorial, you’ll use a latch hook tool to pull yarn through a canvas, building a soft, dimensional surface. Once your textured panel is complete, it’s sewn onto a cosmetic bag (included) for a custom handmade finish. Please note that the designer uses the word “Crochet and crochet hook” in the video, which is not the right term for latch hook. You are using a latch hook tool to pull yarn through the canvas and secure it with a knot.
Please note that our designer uses the word “Crochet and crochet hook” in the video, which is not the right term for latch hook. You are using a latch hook tool to pull yarn through the canvas and secure it with a knot.
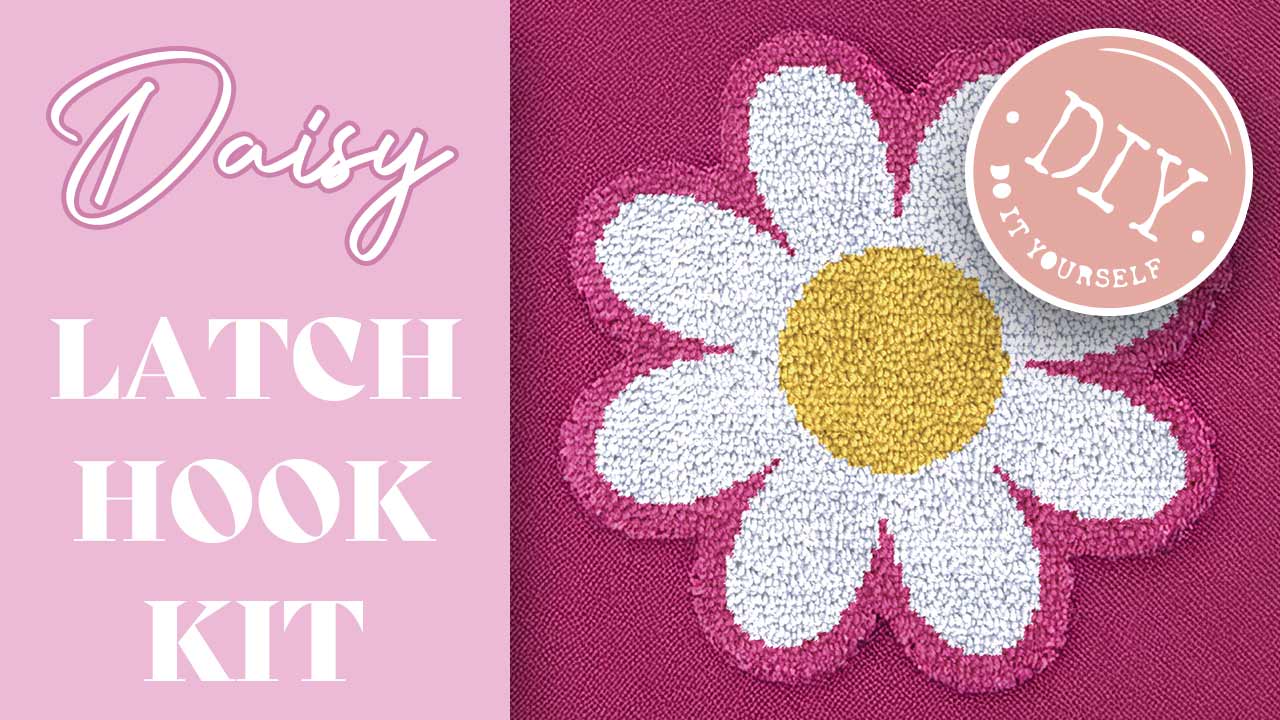
Daisy – Latch Hook DIY Kit
YouTube Link is here.
PDF Link daisy latch hook kit instructions
Learn how to complete the Daisy Latch Hook Kit step by step. This tutorial shows how to use the latch hook tool to add yarn through the fabric mesh, following the color guide to fill each section. A relaxing project that’s perfect for beginners and a fun way to create your own handmade blanket or wall hanging.
Please note that our designer uses the word “Crochet and crochet hook” in the video, which is not the right term for latch hook. You are using a latch hook tool to pull yarn through the canvas and secure it with a knot.
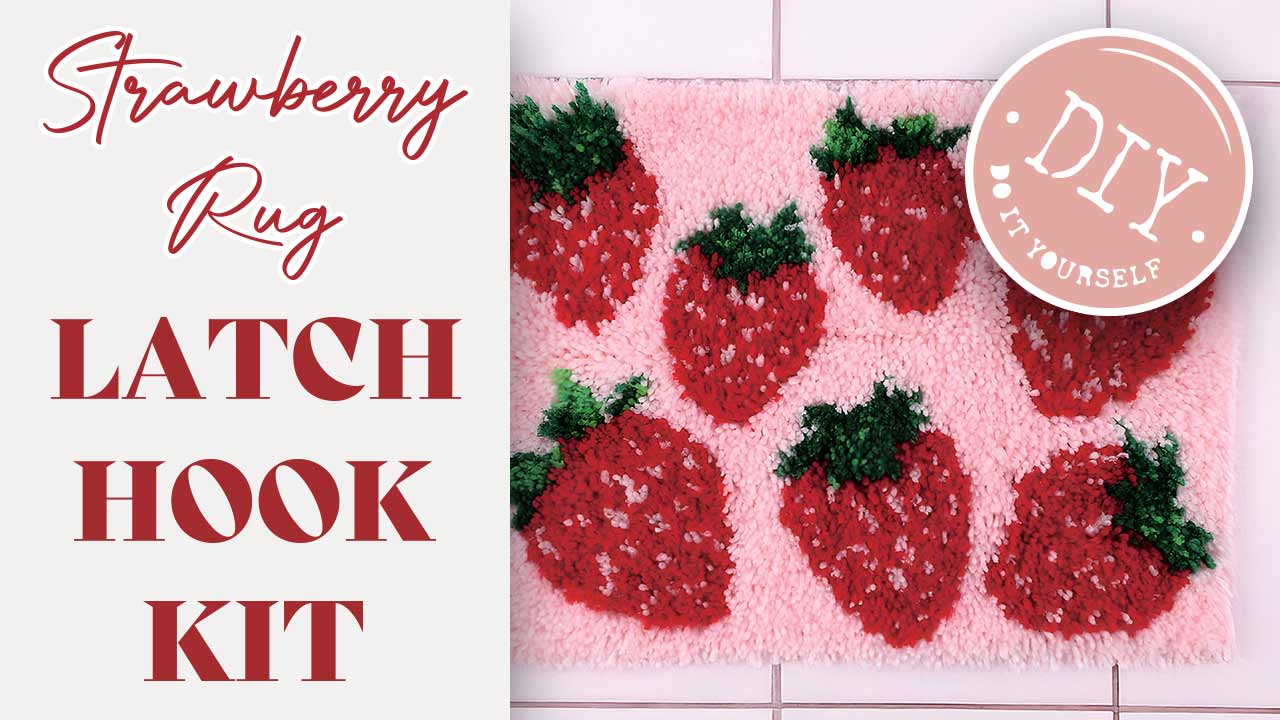
Strawberry Rug – Latch Hook DIY Kit
Project PDF strawberry rug latch hook instructions
Extra PDF for Strawberry Chart Strawberry chart
YouTube Video is here.
Learn how to make the delightful Strawberry Rug with our latch hook kit. This tutorial walks you through every step: using your latch hook tool, matching yarn colors to the printed mesh, and filling each opening with ease. While the process takes time, it’s rewarding — and you’ll find yourself getting quicker as you go. When you finish, simply glue the edges to the back for a clean look.
Please note: our designer occasionally says “crochet” in the video, but you’re actually using a latch hook tool to pull yarn through the canvas and secure it with a knot.
The designer chose to make it a bed topper (blanket) but we know it as a rug.
Embroidery- DIY Woven Bag Kit

Project PDF woven bag instructions
YouTube Video Link
Learn how to complete your DIY woven bag with simple embroidery techniques! This step-by-step video shows you how to use the threading aid, secure flower lace, stitch carefully, and finish with pom-pom trim. Perfect for beginners, this project is a fun way to personalize your own handmade accessory.
This kit includes everything you need to start stitching right away. Enjoy the process and see how easy it is to create something beautiful!
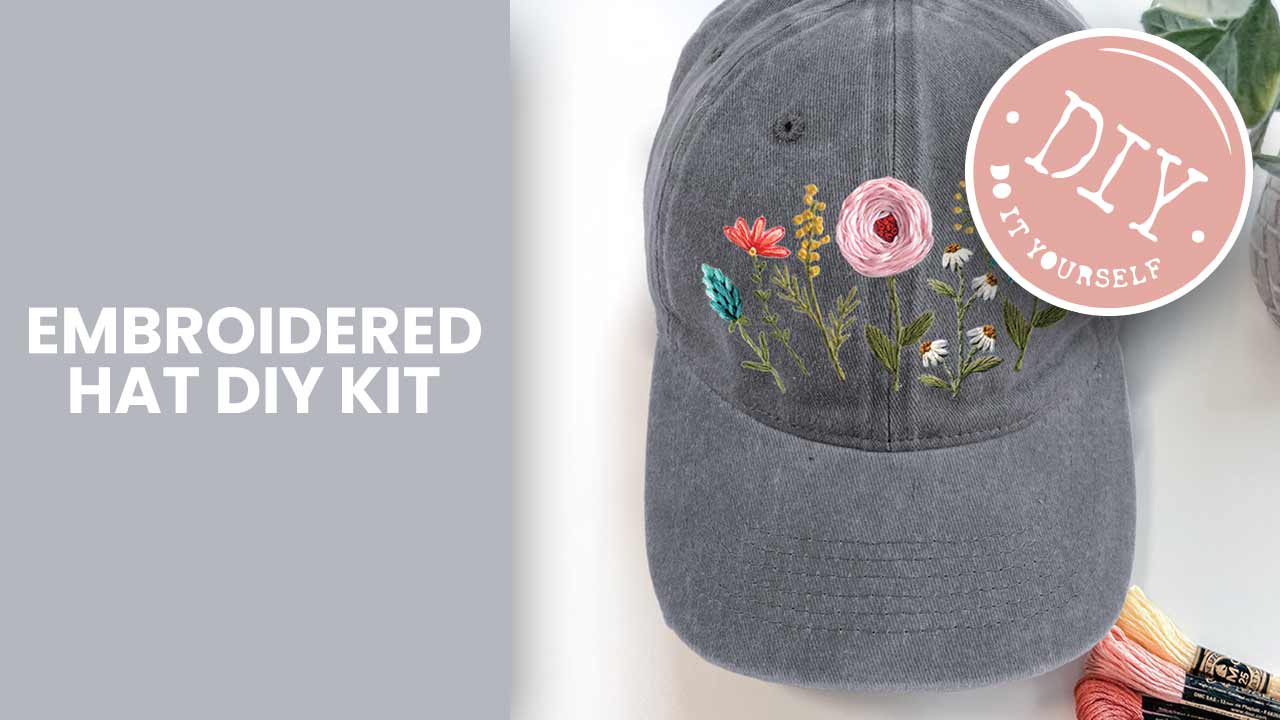
Embroidery- DIY Hat Kit
Project PDF embroidery hat instructions
YouTube Video link is here.
Ready to stitch up something stylish? In this tutorial, we’ll show you how to embroider your own hat from start to finish. You’ll learn how to set up your hoop, add leaves, petals, and fill areas with color, all while making it your own. By the end, you’ll have a beautiful hat ready to wear or gift. Let’s dive in and get stitching!
Important Tips!
Water soluable web interfacing is also known as stick and stitch paper.
The hat fabric is thick, especailly around seams. It helps to poke your needle through partially and then use a jewelry flat nose plier to pull it all the way through.
There is a special knotting technique shown in the video we call “the french knot” in North America. It is not always easy, so you can replace it with a simple stitch or watch other tutorials to master the stitch.
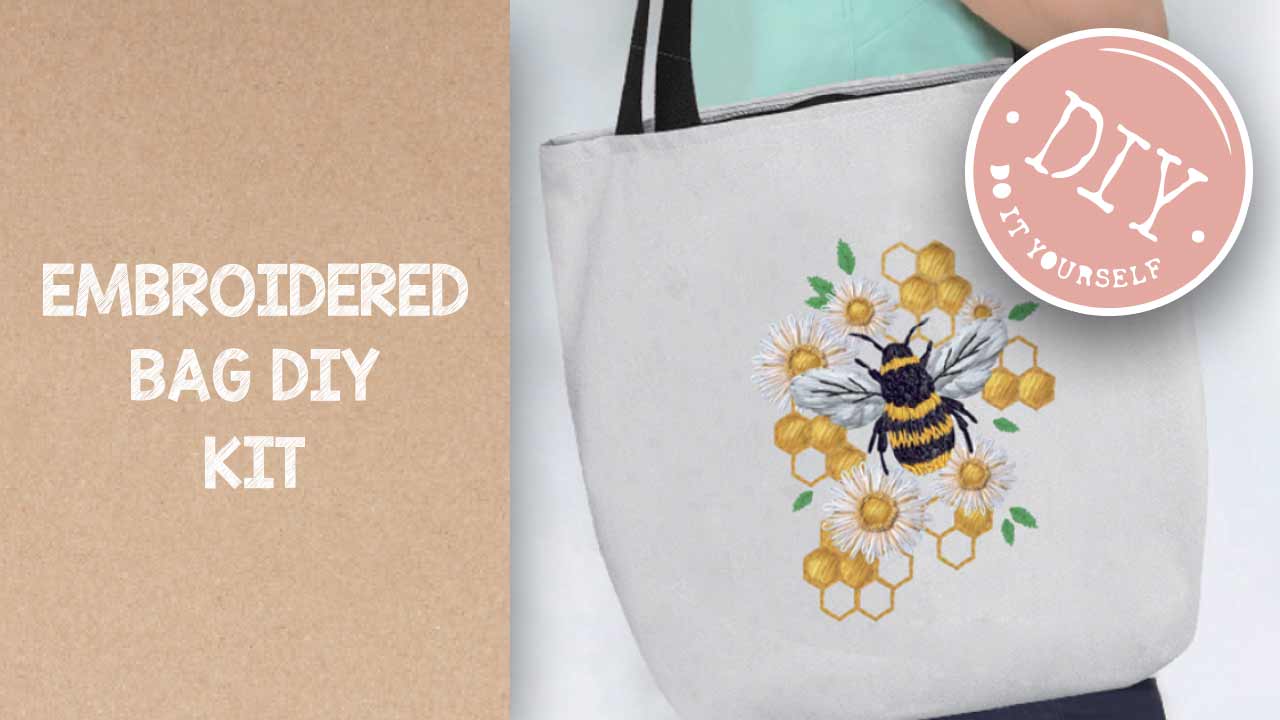
Embroidered Bag – DIY Kit
Project PDF is here. embroidery bag instructions
YouTube Video is here.
In this workshop, you’ll learn how to embroider a canvas bag from start to finish. The project includes framing your fabric, threading techniques, and step-by-step guidance for stitching flowers, leaves, and a detailed bee motif. Perfect for beginners and anyone looking to build embroidery skills while creating a practical project. Celebrate the charm of bees with this handmade design and consider embroidering other everyday opbjects.
Tips: Our designer translated needle into “iron wire” which makes sense but you know it as a needle.
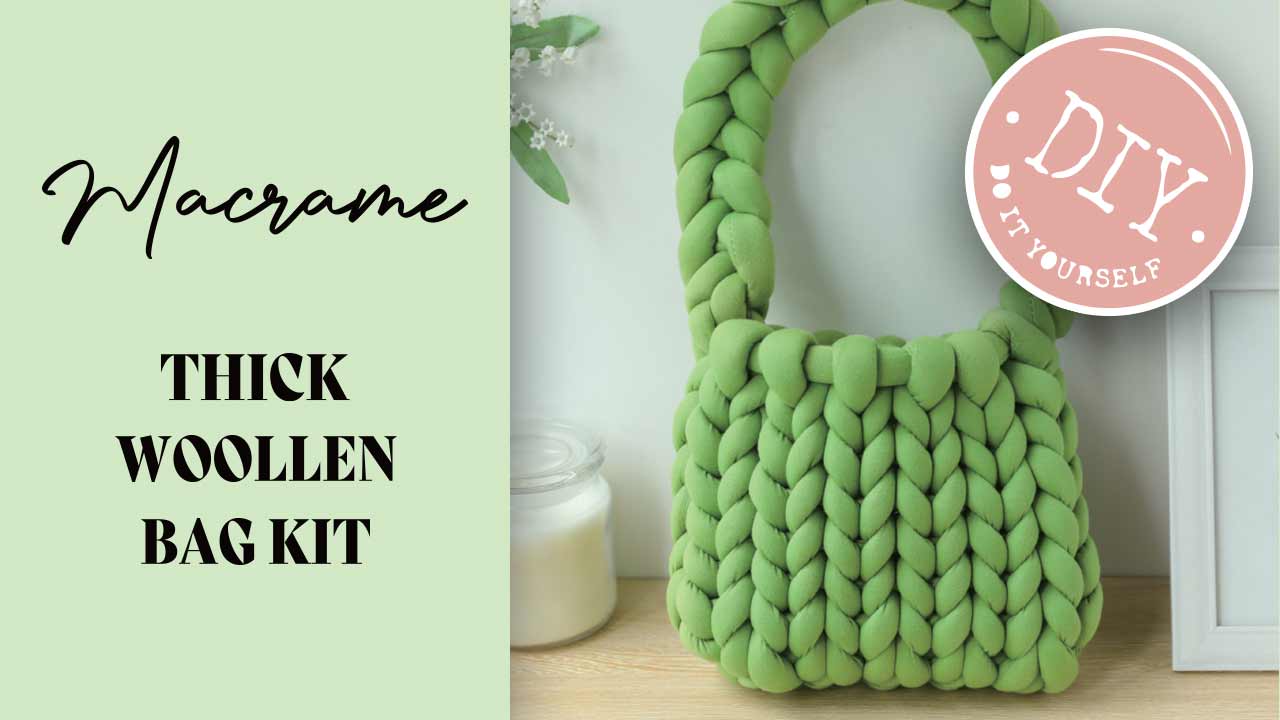
Macrame Thick Woollen Bag – DIY Kit
Project PDF is here. thick wool bag macrame instructions
YouTube Video is here.
This workshop shows how to make a Thick Wool Macramé Bag using chunky Icelandic wool and easy techniques.
Learn to start with slipknots, work neat rows of loops, shape your bag as you go, and finish with clean edges and tidy tassels. The instructor demonstrates every step — flipping, pulling, looping — until your bag comes together beautifully. At the end, you’ll have a stylish wool bag that’s as fun to make as it is to carry.
Tips:
For this video, the chinese to english translation used the word “needle” when no needle is actually used. It should say “loop opening” which is very clear if you watch the demonstration without reading the text.
Coils is a term used in China, but we believe loop is a better description.
You can see the white cotton inside this unique yarn….you can choose to stitch the fabric over it closed on either end of the project.
Macrame Handmade Clutch – DIY Kit

PDF Instructions is here. handmade clutch instructions
YouTube video is here.
In this video tutorial, we show step-by-step how to create a stunning handmade macramé clutch from start to finish. From preparing and measuring threads to weaving intricate circles, diamond patterns, and securing the final stitches, this tutorial walks you through every detail. We’ll also guide you through sealing the bottom, flipping the bag inside out, and finishing with a zipper so your clutch is beautifully complete and ready to use.
The original designers are in China, so you may note some odd translation to english. The main cord in North America is usually called Macrame Cord, but it is refered to as Braided Wire. Because of this, you will see the instructor reference “four wires” instead of four cords. It is better to just watch the demonstration and avoid the text.
Flip the bag over means: Turn the bag inside out.
The instruction says “next lap” which is the same as “next section.”
Macrame Handmade Placemat -DIY Kit

Project PDF is here: handmade placemat instructions
YouTube Video link is here.
Learn how to craft your very own handmade macramé placemat, one knot at a time. This video walks you through every step: from cutting and taping your first cord to weaving, braiding, tying flat and diagonal knots, and finishing with perfectly trimmed tassels.
The kit includes the cord you need — just follow along and you’ll have a beautiful placemat ready for your table in no time. Perfect for beginners or anyone ready to try something new and relaxing.
TIP: The first step is cutting TWO 35 centimeter long ropes. (The text shows 2.35cm)
Macrame Handmade Headband – DIY Kit
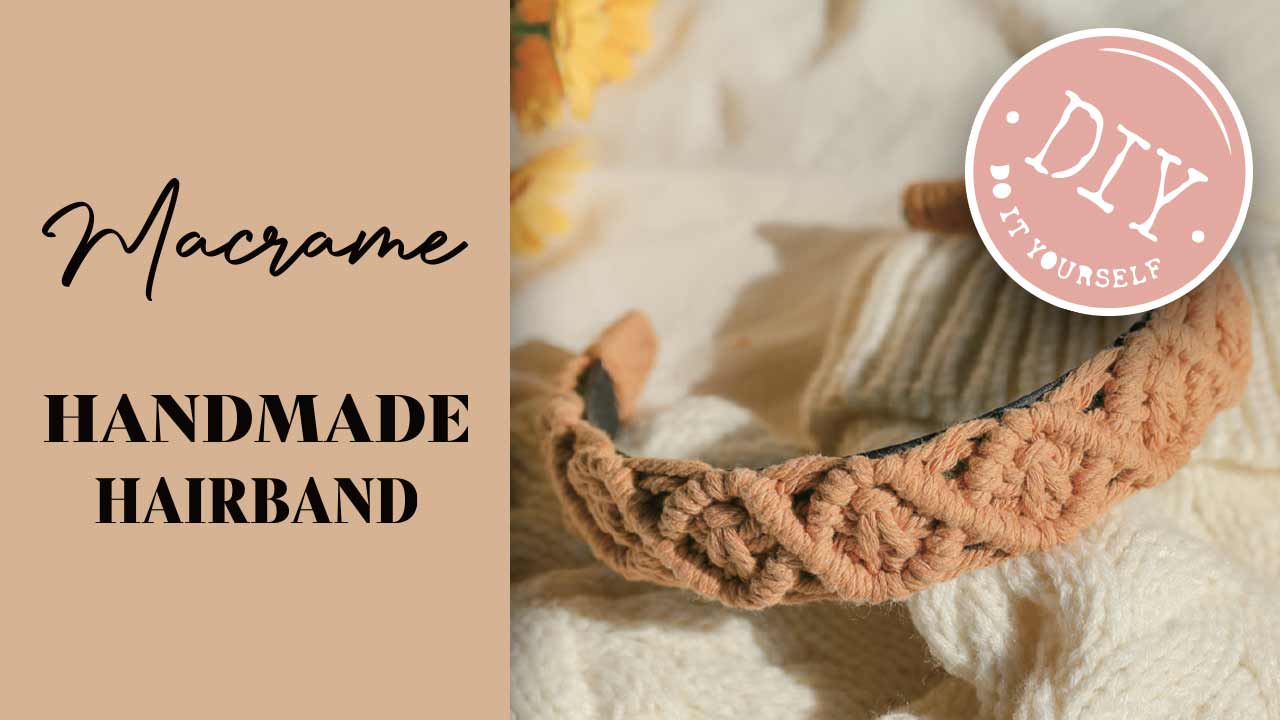
Project PDF is here: handmade headband instructions
YouTube Video is here.
Learn how to knot your way to a super cute macramé headband!
This DIY project walks you through each step – from creating square knots and double half hitches to adding the final gathering knot. We’ll turn simple cords into a finished piece ready to glue onto a headband base.
All you need is some cord, a little patience, and a hot glue gun. Let’s make something stylish for your hair today!
TIPS
The original designers are in China, so you may note some odd translation to english. Macrame is a common knotting technique that occassionaly gets translated into the word “crochet.” You will find it easier to focus on the demonstration and skip the text that appears.
At the end of the video, the instructor shows a sliding knot technique designed to cover all the ends. It isn’t easy to share as text, so watching the technique is better. You could also wrap the cord and hot glue it in place.
Sunflower – Crochet DIY Kit

Project PDF is here. sunflower crochet instructions
YouTube Video is here.
Learn how to crochet a realistic sunflower from start to finish using just yarn, a hook, and a little wire magic. This workshop walks you through the entire process—beginning with the flower’s core, followed by two styles of petals, a leaf, and a sturdy stem. You’ll work in the round, increase and decrease stitches, and even add picot edges for texture. Watch as each layer brings your flower to life. Whether you’re making one bloom or a whole bouquet, this tutorial will guide you stitch by stitch to a beautifully crafted sunflower.
Bouquet Kit – Crochet DIY Kit

PDF Instructions are here. bouquet flowers instructions
YouTube Video is here.
Crochet a Bouquet – Step-by-Step Flower Workshop
In this video, we show you how to crochet a full bouquet of handmade flowers using the kit. You’ll follow along to create roses, forget-me-nots, leaves, and the final arrangement.
We cover:
• How to crochet each flower from the first chain to the last petal
• Simple techniques to shape petals, leaves, and calyx
• How to assemble all the parts into a finished bouquet
This is a great project for anyone who enjoys making something from start to finish. All you need is the kit and your crochet hook.
Project PDF includes a reminder of crochet short form acronymns and a printed version of the text that appears in the video.
Flower Coasters- Crochet DIY Kit
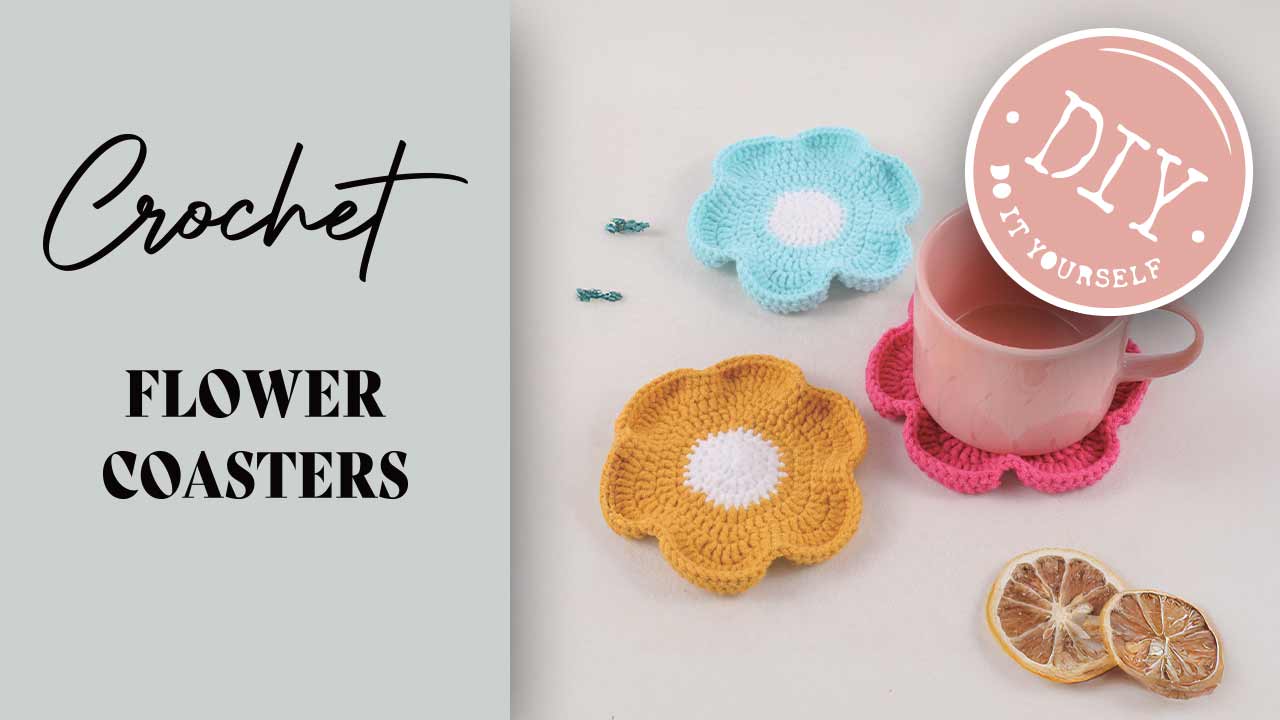
Project PDF instructions flower coasters instructions
YouTube Video is here.
Learn how to crochet playful flower coasters step-by-step using the yarn and tools in your kit. This beginner-friendly video shows how to make beautiful rounds with half-double crochets, double crochets, and clever increases. You’ll follow along to shape and build each petal using color changes and textured stitches. A great way to practice your skills and make something cheerful for your table!
No guesswork, just yarn, hook, and fun. Let’s get stitching.
Granny Square Headband- Crochet DIY Kit

Project PDF Instructions granny square instructions
YouTube Video is linked here.
Learn how to crochet a colorful Granny Square Headband step by step. This video takes you through every stitch, from forming your first square to sewing them together and shaping the final band. You’ll work with double crochets, simple decreases, and bold color changes to create six connected squares and tapered edges. Finish with a custom-length strap to fit your head perfectly. A beautiful blend of retro charm and modern flair, all made with yarn, a hook, and a bit of patience.
TIP: If you make all six granny sqaures the headband is x-large. Consider only making 5 or 4 depending on who will wear it.
Sunflower Tote Bag – Crochet DIY Kit

Project PDF instructions are here: sunflower+tote+bag+instructions-compressed
Temporary YouTube Video is here.
Brighten your day with a handmade bag that’s as cheerful as a summer garden. This kit has everything you need to crochet a beautiful sunflower motif tote, complete with vibrant petals, leafy green accents, and a sturdy shoulder strap.
You’ll learn how to create individual sunflower squares, assemble them into panels, and join them seamlessly for a professional finish. Step-by-step instructions guide you through puff stitches, color changes, and decorative edging, making this project both rewarding and fun.
Whether you’re treating yourself or making a thoughtful gift, this sunflower bag will turn heads wherever it goes.
Plant Hanger – Crochet DIY Kit

Project Pattern is here: DIY Crochet Plant Hanger Tutorial
New YouTube Video is here.
DIY Crochet Plant Hanger Tutorial – Beginner-Friendly Step-by-Step Tutorial
Learn how to make a crochet plant hanger from start to finish using the kit. In this detailed tutorial, you will crochet along with May as she guides you through each step. Perfect for beginners or anyone looking for a relaxing and creative project.
In This Video:
Learn the basic crochet stitches including slip knot, chain, and double crochet
Make five granny squares
Weave in ends and sew the squares into a basket
Crochet braided hangers
Assemble and finish your custom plant hanger
Macrame Shoulder Bag – DIY Kit
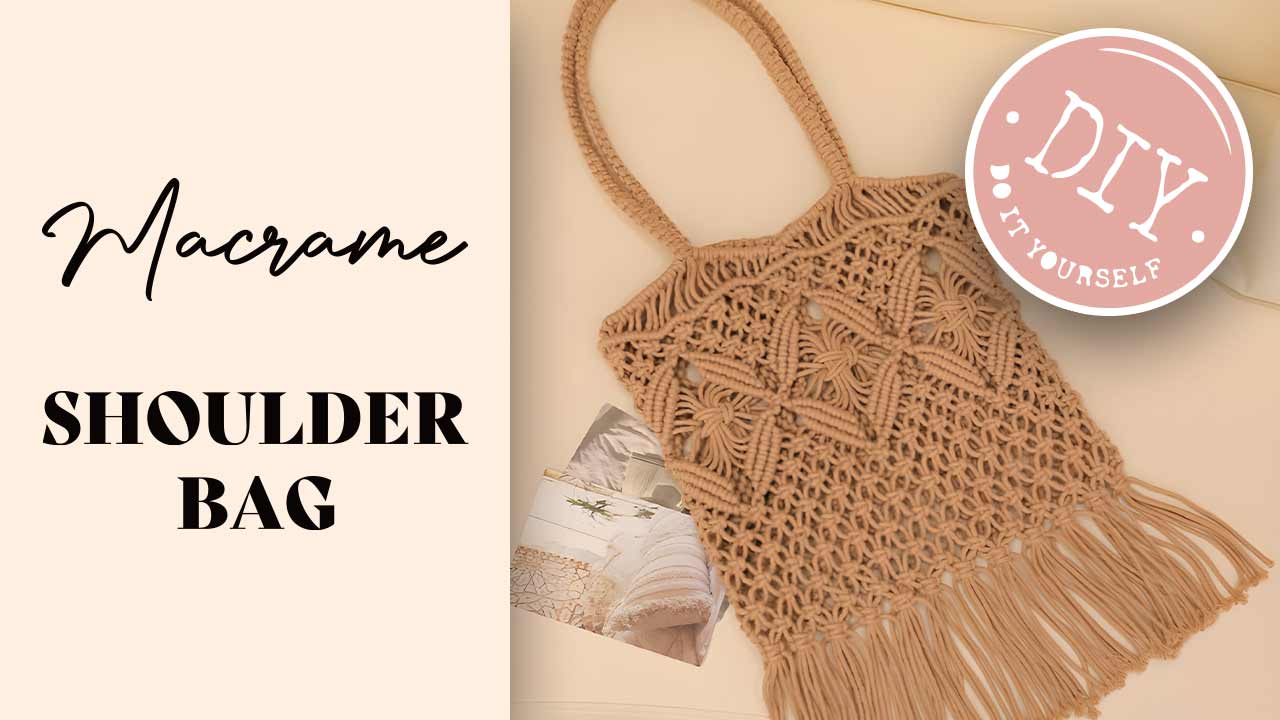
YouTube Video is here.
Your instructor May will show you how a few simple cords can transform into a beautifully patterned macrame shoulder bag. She guides you through every knot with a calm rhythm that makes the whole process feel inviting and surprisingly easy. You will shape sturdy handles, build the flowing pattern of the bag body, and finish with a soft fringe that feels wonderfully handmade. Grab your kit and scissors and follow along with May. Your new macrame bag is about to come to life.
Your Instructor: May Flaum Designs
Based in California, May has been crafting for as long as she can remember. From scrapbooking and sewing to creating magical celebrations for her family, she brings a love of making into every part of her life. For more than 15 years, May has taught classes both in local stores and online, published books, managed a craft store, and designed projects for top manufacturers in the paper crafting industry. Her passion is sharing ideas, inspiring others, and making the creative process fun and approachable. We’re thrilled to have May guiding this class and know you’ll enjoy learning from her experience and enthusiasm. Grab your kit and follow along! May is on all social media platforms: @craftwithmay and Instagram @craftwithmay
Flowers Candle Kit
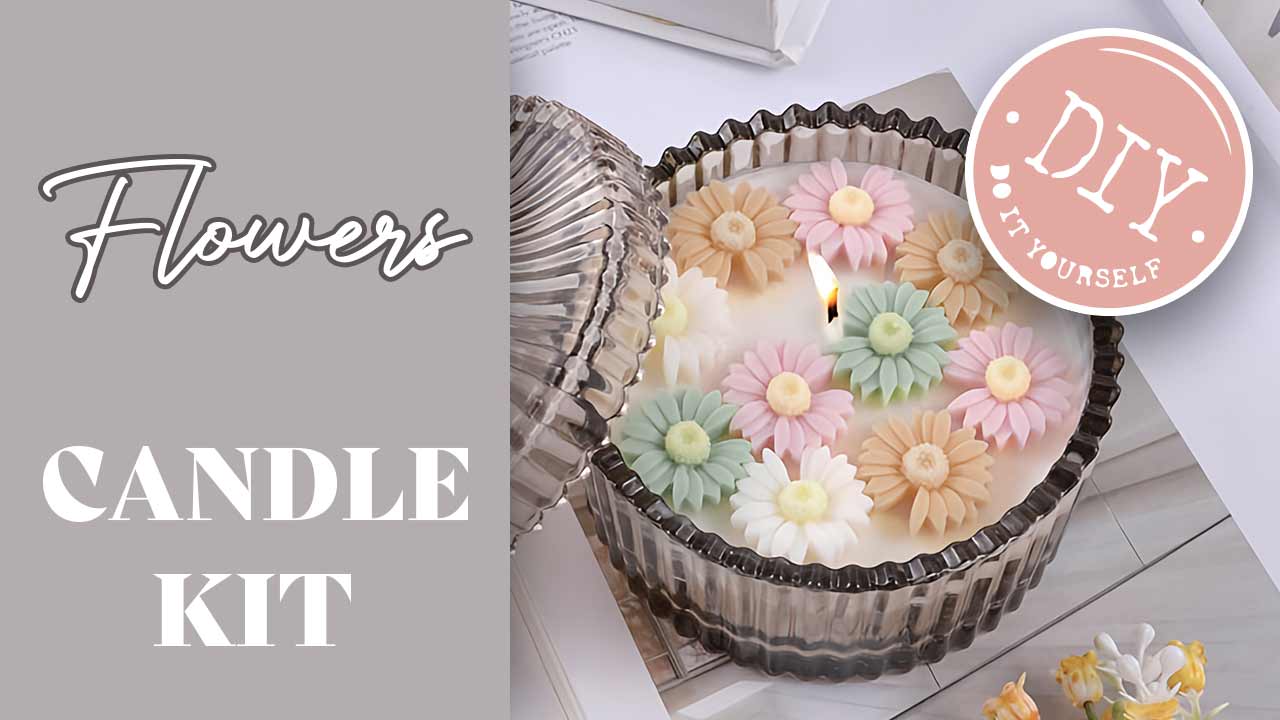
PDF is here: flowers candle instructions (compressed)
YouTube Video is here.
Create Your Own Flower Candle at Home
This project shows you how to turn simple wax powder into a charming floral candle that looks straight out of a boutique. You’ll see how to tint your wax, cast tiny petals in two colours, unmold each blossom, and set them into a glass container for a finished candle with real personality. The steps are simple to follow and the results feel wonderfully handmade.
You’ll learn how to
• Mix and melt wax powder
• Colour the centers, petals, and accents
• Use a flower mold for crisp details
• Build the candle in a glass jar
• Position and trim your wick for a clean burn
It’s a relaxed project that suits beginners and seasoned makers alike. Watch along and craft a candle with a little glow and a whole lot of charm.
Please take a moment to review the safety tips at the end of the PDF.
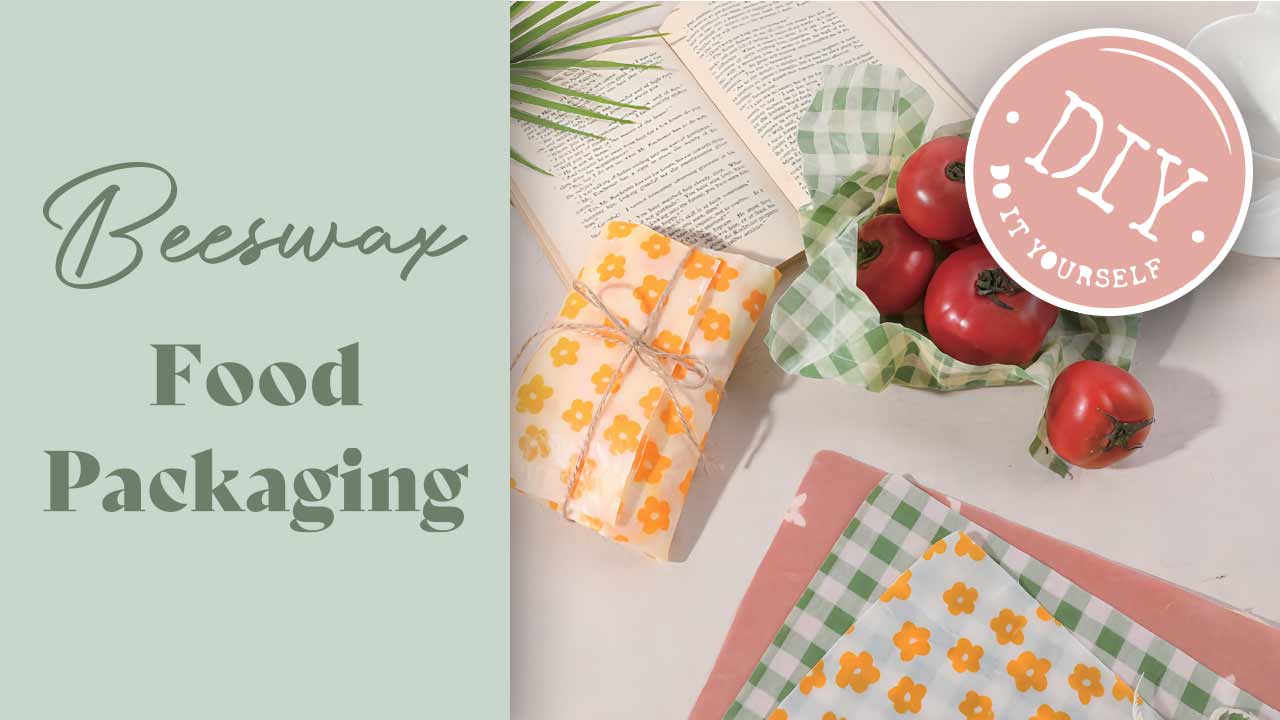
Beeswax Food Packaging Kit
PDF is here: food packaging instructions
Video is here.
Make Your Own Reusable Beeswax Food Wraps
This tutorial shows you how to transform simple cloth and beeswax into practical, reusable food wraps you can use every day. The process is quick, tidy, and surprisingly satisfying. You’ll see how to prep your fabric, cut your wax paper pieces, melt the beeswax with an iron, and infuse the cloth so it becomes naturally water-resistant.
You’ll learn how to
• Smooth and prep your cloth
• Layer sulfuric acid paper to protect your workspace
• Add beeswax evenly across the fabric
• Use heat to melt and absorb the wax
• Test the finished wrap for water resistance
These wraps are great for covering bowls, wrapping snacks, and cutting down on single-use plastics. Follow along and create a kitchen staple you’ll reach for again and again.
Rainbow Arch Candle
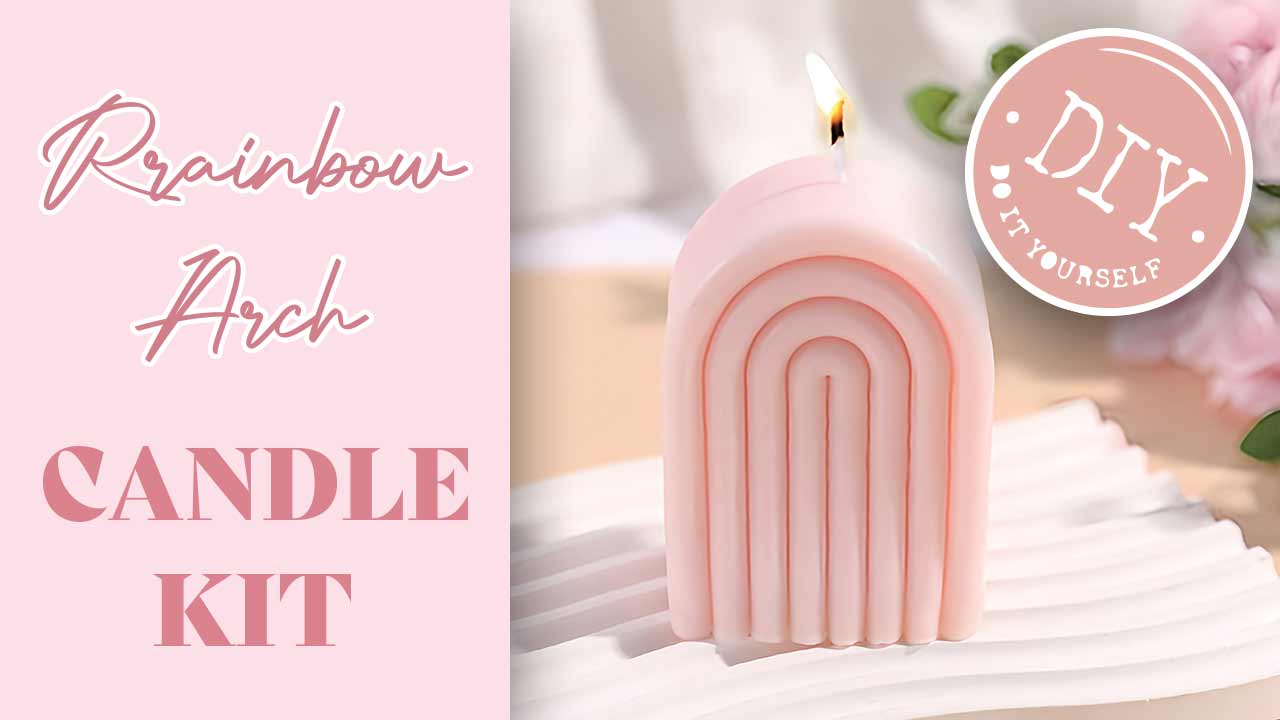
Project PDF rainbow arch candle instructions
Video is here.
Create a Rainbow Arch Candle at Home
This video shows you how to turn simple wax powder into a playful rainbow arch candle. You’ll follow each step as the wax melts, the colour mixes in, and the mould takes shape. If you enjoy candle projects that feel joyful and quick to finish, this one fits the bill.
You’ll see how to
• Weigh and melt your wax powders
• Blend in the dye for a smooth, even tint
• Pour the melted wax into the rainbow mould
• Let the candle cool and unmould cleanly
• Trim the wick for a crisp final look
The process is beginner friendly and the result has tons of charm. Watch along and craft a sweet little rainbow candle that brightens any room.
Striped Cyliner Candle Kit
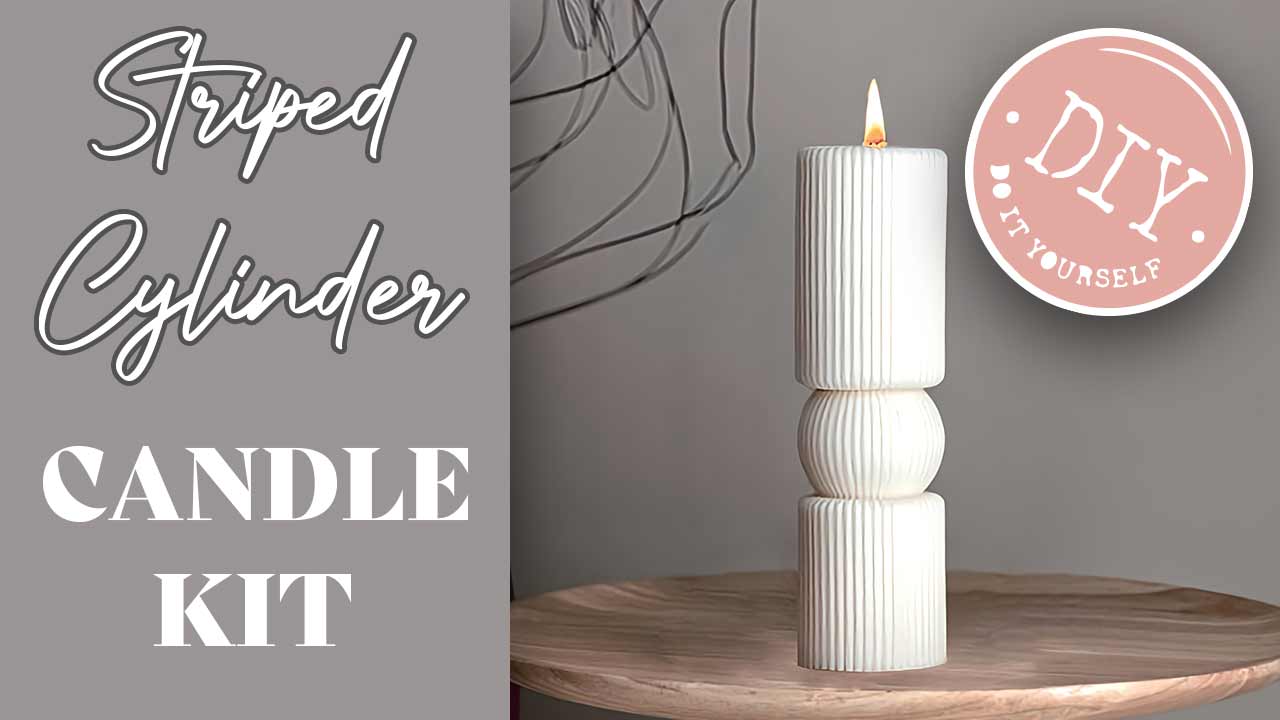
PDF is here: striped cylinder candle instructions
Video Is here.
Make Your Own Striped Cylinder Candle
This tutorial shows you how to create a clean, modern striped cylinder candle using simple tools and wax powder. You’ll follow the full process from threading the wick to unmolding a smooth finished candle that looks wonderfully polished on a table or shelf.
You’ll see how to
• Thread and secure your wick through the mold
• Melt and dissolve wax powder for an even pour
• Fill the mold with steady, consistent technique
• Cool, unmold, and trim the candle for a finished look
It’s a straightforward project with great results for beginners and seasoned candle makers. Follow along and craft a sleek striped candle you’ll want to display right away.
Twine Knot Candle Kit

Project PDF: twin knot candle instructions
Video is here
Twine Knot Candle DIY Tutorial
This tutorial shows you how to create a sculptural twine knot candle that looks playful and modern. The process is simple to follow — you’ll watch the wax melt, the colour blend in, and the mold take shape as the knot comes together.
You’ll learn how to
• Combine your wax powders in the right ratio
• Thread and secure the wick through the knot mold
• Melt and tint the wax for a smooth pour
• Fill the mold and unmold a clean, detailed shape
• Trim the wick to finish your candle neatly
It’s a quick project with a bold final look, great for beginners or anyone who loves sculpted candle styles.
Yin Yang Symbol Candle Kit
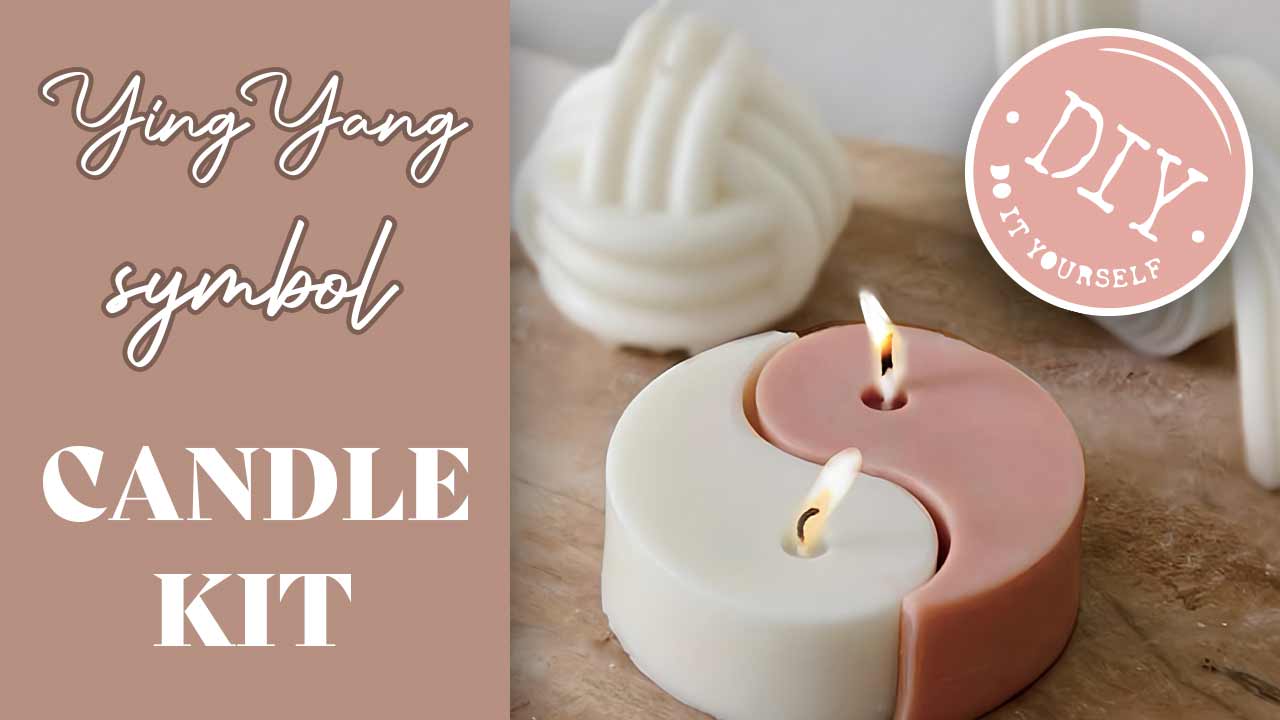
Project PDF: yin yang candle instructions
Video Is here.
Yin Yang Candle DIY Tutorial
This video shows you how to craft a striking yin yang candle, poured in two separate halves and joined into one balanced design. You’ll see how each side is melted, coloured, poured, cooled, and unmolded before coming together as a unified candle.
You’ll learn how to
• Measure and mix wax powders in a one-to-one ratio
• Thread and secure your wick through the mold
• Melt, tint, and pour each half of the design
• Unmold two clean shapes and trim the wicks
• Assemble the final yin yang form with a smooth finish
It’s a calm, satisfying project with a beautiful result that looks great on a shelf or table. Follow along and create a candle with real harmony and style.
YOUTUBE:
In 2024, our company met with a talented young design team in China specializing in craft kits. We were presented with dozens of inspiring concepts and selected our first collection to launch this year.
These kits reflect a growing trend: offering unique products alongside video tutorials for instruction. You won’t need to hunt for supplies or tools — everything you need is included. And once you finish your project, you’ll be ready to dive right into something entirely new. To support makers even further, we’re also adding step-by-step written instructions as a downloadable PDF.
Whether you’re creating something cozy, stylish, or practical, our kits are here to inspire your next handmade project. From classic hobbies like Crochet and Embroidery to modern favorites like Latch Hook, Macrame, and Punch Needle, there’s something for every maker to enjoy.
Grab your kit and follow along!
If you enjoyed this kit and want to try another one, you can find them on Amazon.
USA
https://amzn.to/4oTPFoU
CANADA
https://amzn.to/4lLNyAP